Are you preparing for your first market or craft show? Feeling a little nervous about what you need to bring and how it’s all going to work? Don’t worry, I’ve got some answers for you.
I’ve been doing markets for about 3 years now and have learned a lot in that time! Hopefully what I’ve learned will help you with your own setup and make you feel a bit more prepared than what I did for my first market.
I’ll aim to answer as many relevant questions as I can in this article as well as show you how I prep for my own markets.
Accepting Payments - Cash/Card
I take all forms of credit card and cash at markets. Most people prefer to pay with card so making it easy for them to do so is really important. There are several different payment apps that you can use to accept card payments, however I chose to use Shopify payment. I chose Shopify because it links directly with my website. The fees are comparable to all the other payment apps like Paypal with a 2.6% fee + 10c for each transaction. Remember to factor this fee into your pricing.
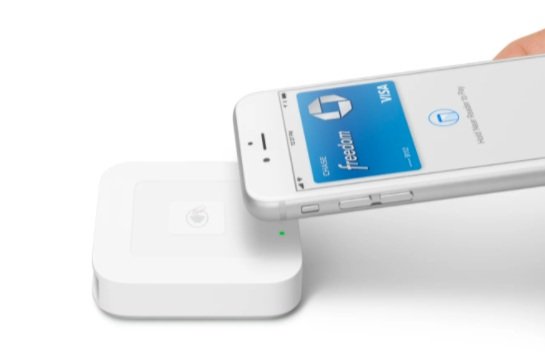
I used to use Square before I switched over to Shopify. Square will give you a free card reader that plugs into your phone when you sign up but I highly recommend spending $50 to get the contactless reader. It connects via bluetooth and people can tap their cards and use Apple, Google and Samsung Pay. Honestly, it has been worth the extra money in the long run.
If you are interested in getting Square for your markets, I highly recommend that you use my referral code for 3 reasons…
-
You get your first $1,000 of money with NO FEES! That means you don’t have to pay the 2.7% charge + 10c per transaction for your first $1,000. You get to KEEP all that money!!!
-
I also get $1,000 of sales with NO FEES!!! So we both win!
-
If you refer someone to Square, you will again get $1,000 with no transaction fees. The gift that keeps giving!
For a small business, not having to pay transaction fees makes a HUGE difference in the amount of money you get to keep in your pocket.
So, if you want to try Square for your payments for markets here is my referral link: TRY SQUARE & GET $1,000 OF SALES WITH NO FEES
I always keep a ‘bank’ of cash for every market which includes a range of bills. I don’t have any items priced lower than $15 so my bank includes about $100-150 of mixed bills of $5, $10 and $20s. This will obviously vary depending on your pricing and the type of market you go to.
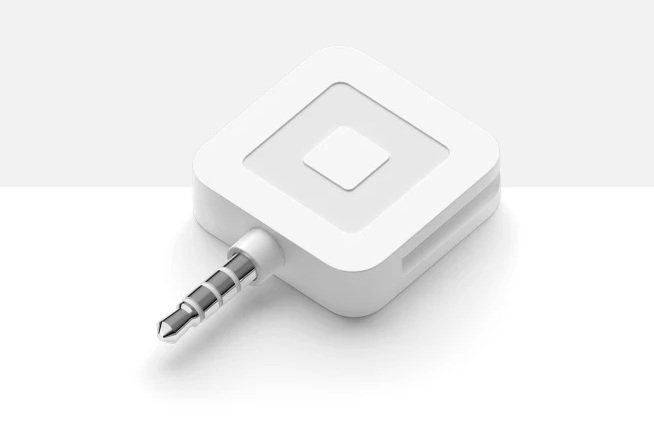
This is the free card reader Square gives you when you sign up. Most phones nowadays don’t even have a headphone jack so in my opinion, it’s worth the $50 to get the contactless reader.
Spend the extra $50 and get the contactless reader. I promise, you won’t regret it!

The shopify contactless card reader.
Insurance
Some markets require you to have insurance to attend their events. If it is a requirement, they will usually suggest an insurance company that you can use. There is an option to purchase insurance specifically for a one off event, you don’t have to purchase for the whole year if it’s not necessary for your business. The markets I attend do not require insurance so I haven’t purchased any but in saying that, there was definitely one time when I wish I had insurance.
Here is a link below to an insurane company that some vendors I know use. I have not ever used this service but wanted to provide an example so you can see what is on offer.
What to Bring
Other artists always ask me, ‘How much do I bring to sell at my first market?’ My answer is always the same, the more diversity the better. You need to have a range of items with several different price points. Two of the most popular products that I sell at markets are my beachy letter keychains ($15) and my small trinket bowls ($20-35). Both are lower priced items that most people can afford, especially when they want to get a small gift for someone.
I always bring a small carry bag of all the important items that I’ll need for each market.
This bag includes:
-
scissors
-
tape
-
extra price tags/care instructions
-
pens
-
extra S hooks
-
hole punch - to punch holes in new tags
-
twine - to hang tags
-
extra velcro strips - to hang the grid wall from the tent
-
logo stickers
-
little bags for small items
-
business cards
- Fan to keep cool in the hotter months - I would recommend this one or this one. Both have rechargeable batteries

I keep all these important items in one bag so they are easy to find.
What to Wear
Wear something comfortable! You’re going to be doing a lot of physical activity from tent setup to moving things around, etc. Especially if you are at an outoor market, check the weather a few days before so you know what to expect and if you need to bring a jacket. Make sure to wear something that represents you as an artist but also represents your brand. You want to be presentable so maybe leave the comfy couch clothes on the couch this time.
I would also recommend wearing a ‘bum bag’ aka fanny pack. This is a great way to not lose track of your money! I keep my cash, card reader, phone and business cards in my bum bag. It keeps me from setting my phone down and losing it. You can have a cash box but someone can easily walk off with that, but good luck with ripping a bum bag off me!

My lovely bum bag made by Kasey from KnottybyKasey.
Branding/Tagging Products
This is a REALLY IMPORTANT part of the process! This part is so underrated by artists and people who are just starting out. Think of it this way…why do all the major brands that we know have bigs signs and their logo everywhere? Because they want to create a familiar, comfortable feeling every time we see their brand. Their products are always clearly marked and you can find their logo and color scheme on everything they sell. Take some time to think about these things for your business and come up with a color scheme and a good logo. I paid a graphic deisgner to create my logo and it was worth every penny! One thing you need to realize is where your strengths and weaknesses are. I could’ve designed my own logo, but would it have taken me ages? Yes. Would I have done as good of a job as designer? Probably not. So in the end, it was totally worth my time to pay a professional to design it for me.
Getting back to branding at the market…people don’t know who you are so we need to tell and show them. Think of all the white tents at a market…they are all in a row and all look the same. We want to stand out amongst the crowd and get people to want to stop. When they stop, we have to constantly put our brand in their mind so you should have it everywhere! I have two small 5x7 signs with my QR code placed in acrylic holders in my tent so people can easily scan and follow me.

I have a 9"x1" banner with my logo and a clear message about what I sell which I purchased on Etsy. There are several places you can get a banner from: FedEx, Staples, Office Max, Local Sign Printer. You will either need to design your own artwork to upload to the site ready to be printed (cheaper option) or pay a designer to do it for you. I designed my own original banner artwork using Canva. It’s a free web based program that I use to design a lot of different things inlcuding my banner, tags and business cards.
The first banner that I had was 8’ long which was great for display but not so great for outdoor markets as it acted like a sail on windy days. I attach my banner to my tent with bungee cords. My bungee cords didn’t come with hooks small enough to fit in the banner eyelets so I had to buy separate hooks, but I did find a few that already come with hooks. I’ll link them below.
The progression of banners throughout the years I've been doing markets...

My First Banner: 8’ x 4’
My Second Banner: 6’ x 4’

My Current Banner: 9'x1'
I have branded price tags on every single product that I sell except for the really small items like keychains and trinket bowls. For these items, I have small bags with my business card in them, prepped and ready to go for when people purchase them. The tags I use are actually care instruction cards that I write the price on. It’s important that people can clearly see the price as most people will not ask, which could potentially be a lost sale.

Make sure your prices are clearly marked on each item.

My care tags double as price tags. Notice the clear branding on the front and back.
When I am finished making an item, the last step before it’s ready to sell is to brand that item. I use a variety of different techniques to do this. For wood pieces, I have a metal branding iron where I burn my logo into the wood. For smaller items, I use either a sticker or a stamp.
I purchase all of my stickers from Sticker Mule. They have great quality stickers and always have deals running. I usually wait until they have a promotion for the size stickers that I need and then purchase in bulk.
If you want to order some of your own stickers, I have a referral link where you get $10 off your first order: ORDER STICKERS FROM STICKERMULE
I normally order my business cards and care instruction cards from Vistaprint as I’ve found they have the most competitive pricing and great quality.
If you want to order some of your own business cards and care instruction cards, I have a referral link for you: ORDER BIZ CARDS FROM VISTAPRINT
Bags
I used to not offer bags when I first started at markets but as the years have gone on, I now have three different sized bags: small, medium and large. I also use colored tissue paper to wrap things like my wine glasses before packing them in the bags.
I will offer to hold an item that someone has purchased at my tent if they are still walking around the market and don’t want to carry it. This way, they can purchase the item and pick it up when they are ready to leave. One word of advice, if you are going to hold and item for someone, you should make them pay in advance! If someone actually wants the item, they will 100% pay for it. When I was first starting out, I had several people say ‘Oh we’ll be back to pick it up later’ and then never come back. So make sure you tell them, that in order to hold the item, they must pay for it.
Packing
This step will obviously depend a lot on what you bring and what kind of car you have but I’ll give you a few tips that I’ve learned along the way.
I have a large plastic bin on wheels that has been amazing! I normally pack the majority of my larger items ie trays, wall art, cutting boards, etc in this bin. Because it has wheels, I can roll it to and from the car to our tent spot. I purchased mine from Home Depot a while ago but I know other people have gotten theirs from Walmart as well. I’ve linked both of them below:
Husky 45 Gallon Bin with Wheels
Sterilite 40 Gallon Wheeled Tote
I have a small bin where I keep all of my smaller items that are more fragile, ie trinket bowls, keychains, coasters, etc.
To protect all of my artwork in transit, I use Glassine Paper. This protects the surface of the resin from scratches. I also pack the larger items standing up rather than laying things on top of each other. I demostrate this in my YouTube video at the top of this page.
Because I’ve been doing this for a while now, I’ve got a method down pat of how to pack the car with all the things I need for the market. As I mentioned earlier, this will depend on your car and what you bring.
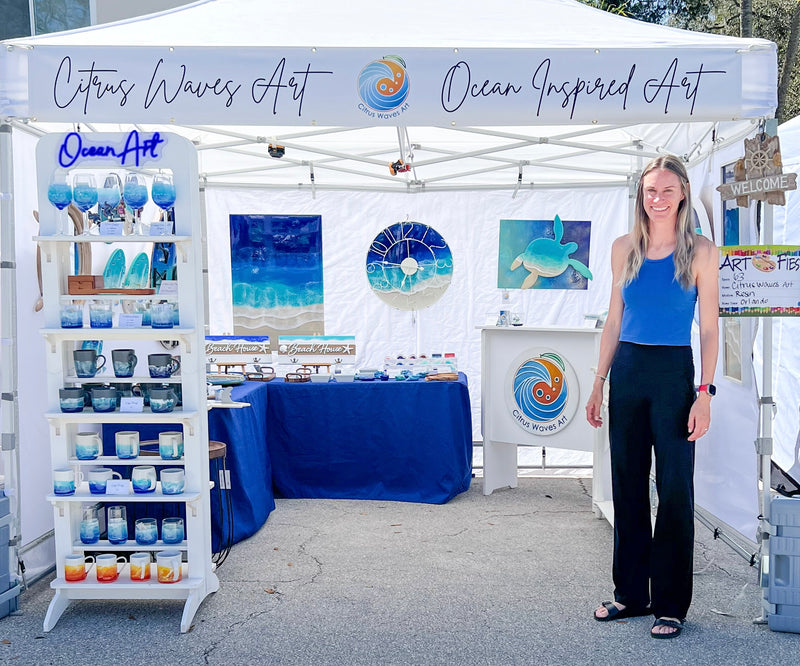
Tent Setup/Display
Here is the fun part! How to display for beautiful art in your tent. So to start, there are a few very important things I need to mention. Most markets have 10x10’ tent spots and depending on the market, they may have very strict rules about keeping things within that 10x10 space so make sure you know the rules when designing your tent space. Alright, now until my key pieces of advice…
-
Get a GOOD TENT! If you are going to be doing this regularly, I highly recommend spending the extra money and getting a good, sturdy tent. Especially if you are going to be doing outdoor events, a good tent is a must! I’ve had two different tents since I started doing markets and have liked them both but the tent I have now is definitely better than the first one I had. The first one was still a good option but the one I have now seems to be way more sturdy, is way easier to setup (by myself I might add) and the side walls attach with velcro, not hooks like my old one.
Here are the two tents that I’ve owned:
ABC Canopy 10x10 Tent which comes in a variety of colors. This is the tent I currently use and LOVE it!
ABC Canopy 10x10 Tent with awning
EZ-Up Canopy 10x10 Tent - this is the tent that I used to have and is still a good option. I unfortunately lost mine in a big storm at an outdoor market which then lead me to purchase my current tent.
-
That last sentence about losing my tent in a storm leads me into my next point. Get heavy weights! All outdoor markets require weights for your tents so you might as well get them when you order your tent. The ABC Canopy 10x10 Tent actually comes with a set of sand bags (sand not included), another bonus for ordering that tent. But if you need to buy the weights separately because you already have a tent, I recommend these ones: ABCCANOPY Sand Bags Canopy Tent Weights, 4 Pack. You can also make your own weights out of PVC and fill them with sand.
-
Tables: My mom actually had 6ft foldable tables already so those are the ones that I use. You can purchase 6ft tables at most major retail stores. I’ve linked some below in case you want to order them from Amazon, because ya know, it’s just soooo easy!
-
Now that you have tables, you need table cloths. I went through a few different ones before I found ones I really liked. I started with the ones that have the elastic on the bottle and are fitted to the table like you might see at weddings or major events. What I found is that they don’t fit that well and I ended up ripping the stitching out of the corners. They also have a moon shape design to them which means you can see under the table which isn’t a good look when you have storage bins sticking out. So eventually I found these ones which I absolutely love! They are way easier to put on, the completely cover the table and go all the way to the ground allowing me to hide my storage bins under them with no one knowing! They are also really easy to clean, just put them in the washing machine and hang dry them. They come in several different colors and sizes as well. I’ll link them below.
-
Hanging Displays/Grid Walls - To display my wall art and clocks I use a grid wall. I use a 2’x6’ Gridwall and actually have 3 of them. I have one standing wall with legs and the other ones I hang from my tent using velcro strips. I assume due to the supply shortage you currently can’t purchase a single standing gridwall like I did a year ago so I’ve linked the ones offered currently below in a 2 or 3 pack. A word of advice if you decide to purchase the gridwall separately from the legs…not all gridwalls are made with the same measurements so check that the leg screws will actually fit before purchasing them separately.
To hang my wall pieces, I use S-Hooks.
2-Pack 2’x6’ Gridwall with Legs - Black
3-Pack 2’x6’ Gridwall with Legs - White
-
Creating height in your display is another important tip. If everything is flat on your table, people walking by can’t see all of your beautiful artwork. I use crates, boxes and stands to do this. My display is constantly changing depending on the products that I have at the time. I also keep refining it and changing things to see what works better. I purchased some small wooden crates from different places like HomeGoods, At Home, Hobby Lobby, Michaels and Amazon. I’ll link some of them below:
Wooden Easel for Table Display
Making Friends
One of the most valuable pieces of advice I can give you is to make friends with other vendors. You can learn so much from talking to your neighbors. It’s usually how I find out about upcoming markets and special events but also the intricacies of market life. Vendors who have been on the market circuit for years have so many tips and tricks, it’s totally worth picking their brain for all that gold! So don’t be shy, meet your neighbors. I’ve made so many amazing friends that welcomed me into the market community and couldn’t be more grateful!

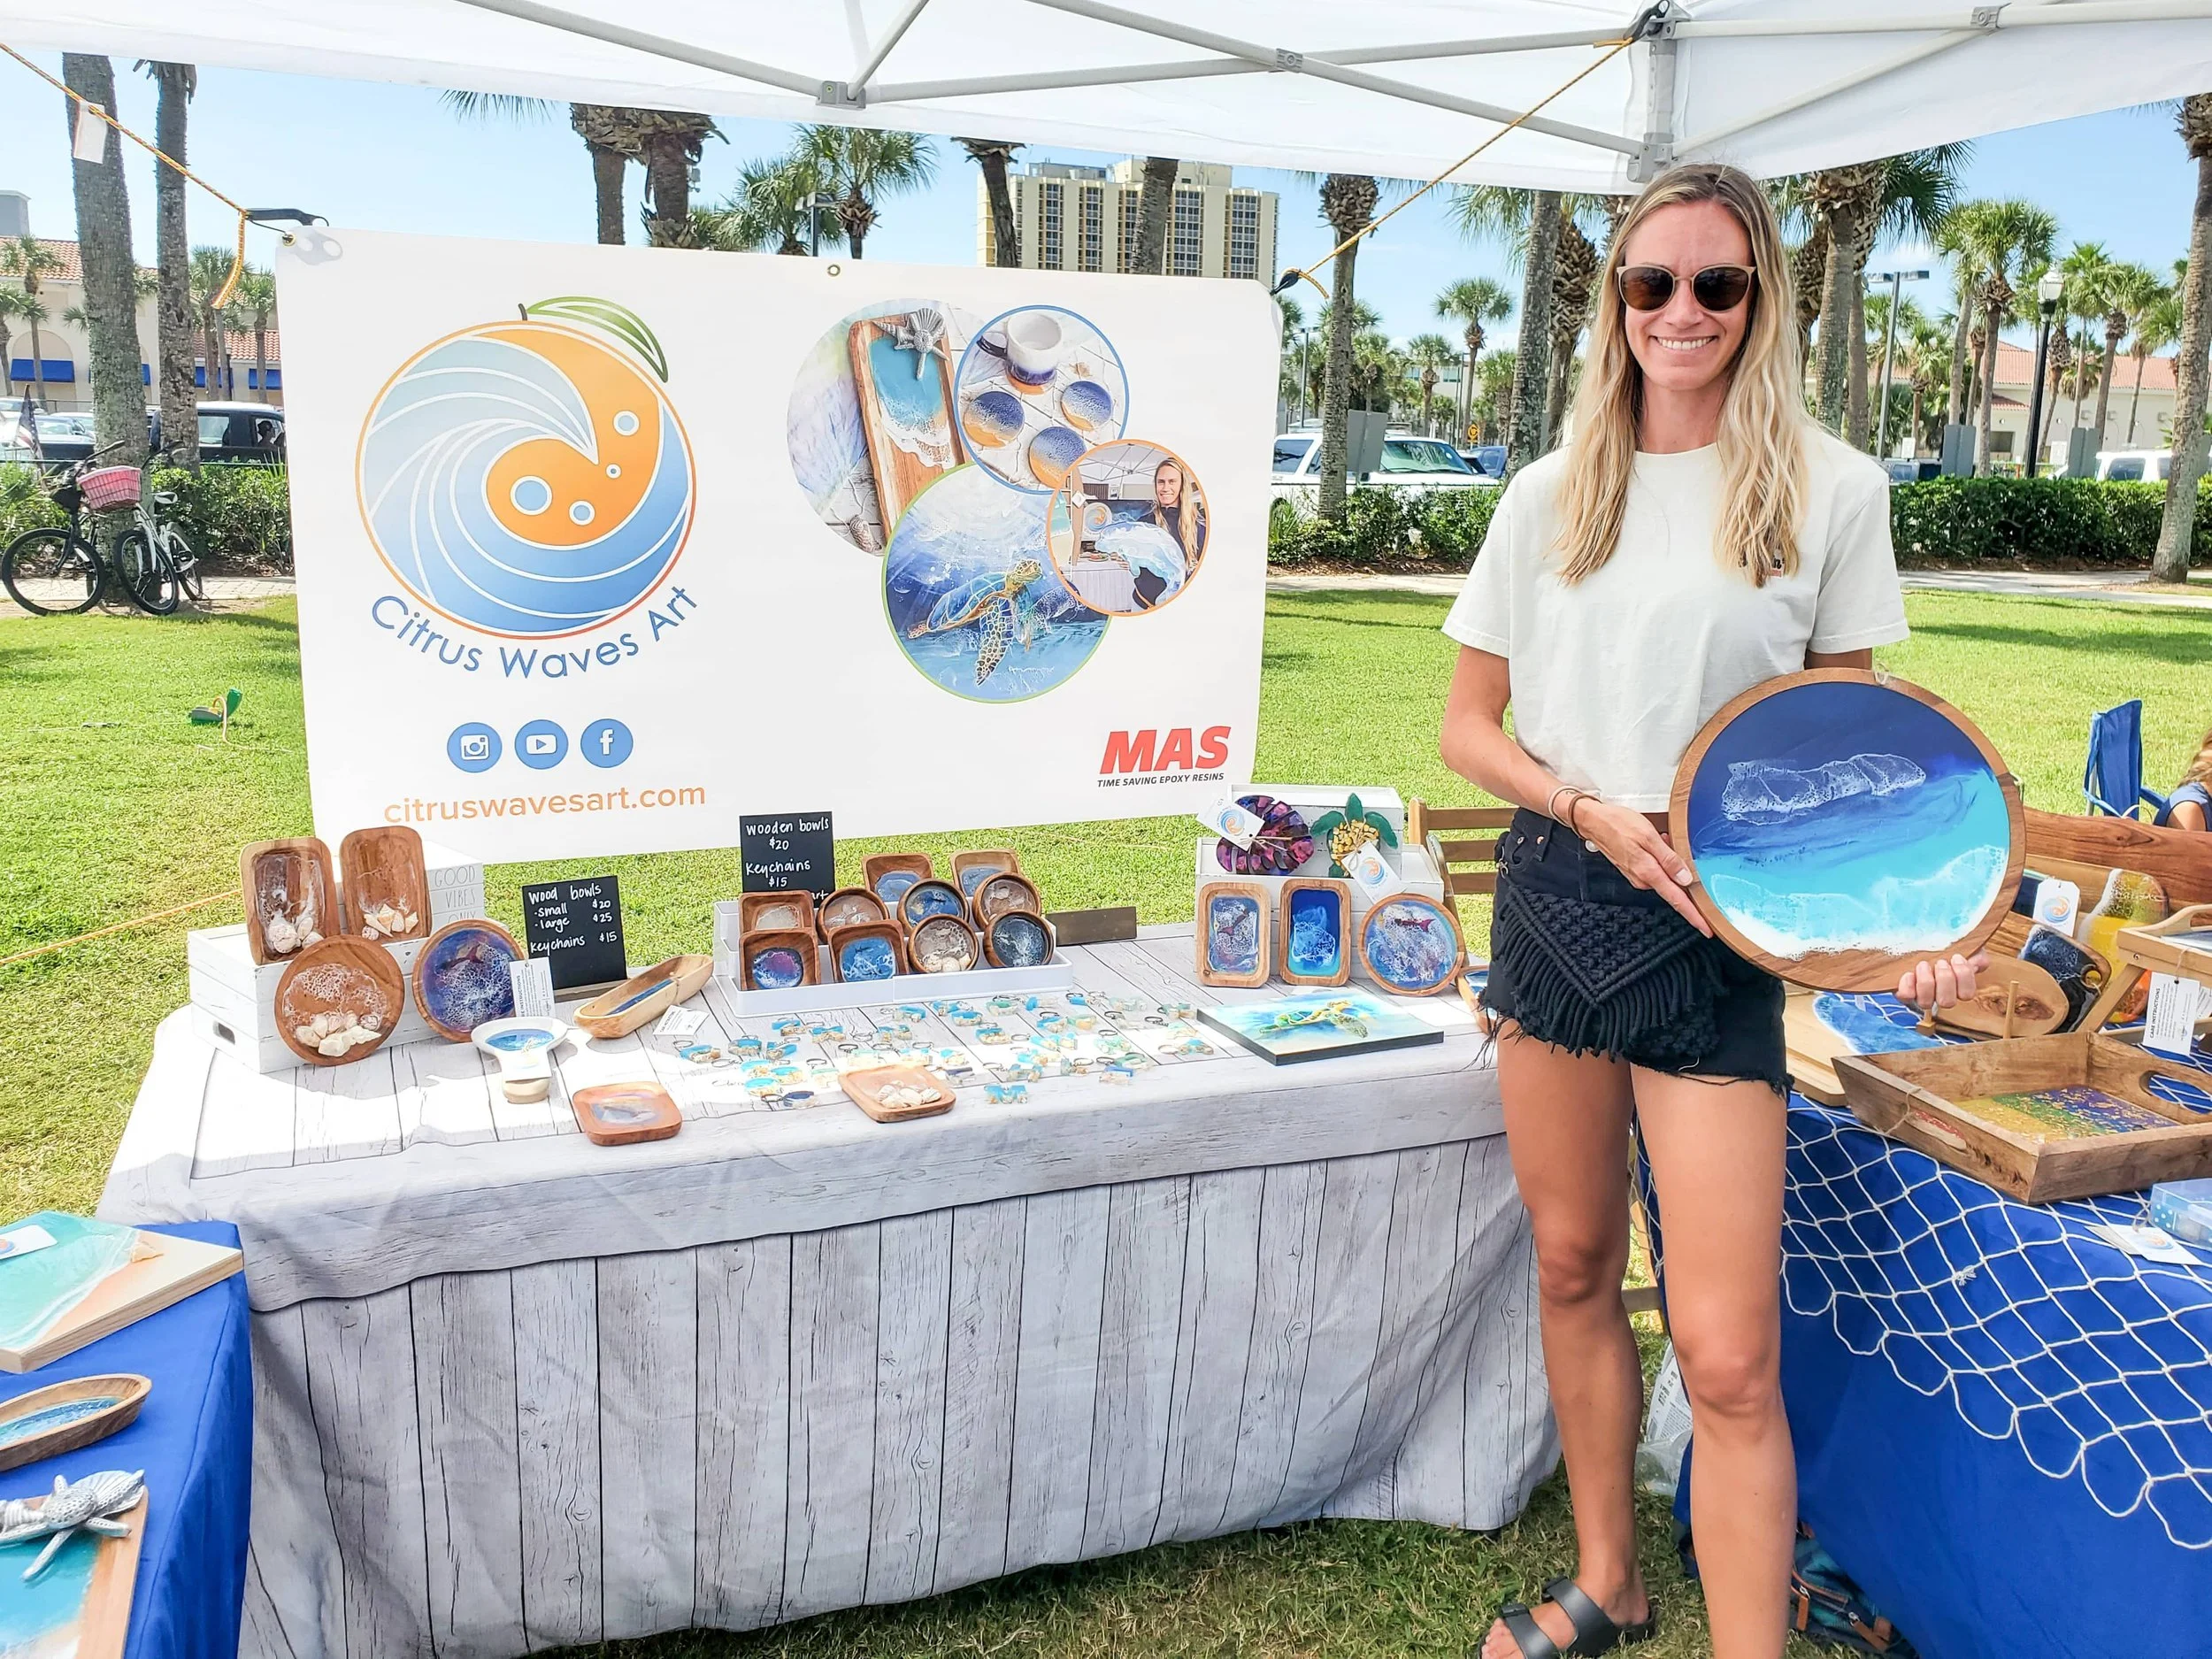
This was my very first market! Oh how far I’ve come since then and you can too!
So, BEST OF LUCK to all of you who take the leap and do your first market! Also congrats to the those of you who are consistently doing markets and still wanted to check out this blog anyways for some tips and tricks. I hope you found this article helpful. If you have any questions or want to leave a comment below, please do. Thanks again for making it to the end and good luck!
2 comments
Showing items 1-2 of 2.

Beach Domines Tutorial
My family plays Mexican Train Dominoes regularly so I thought it would be fun for us to play with our own beach set of dominoes. I hadn’t seen anyone... Read More
How to Prep for a Market or Art/Craft Show
Are you preparing for your first market or craft show? Feeling a little nervous about what you need to bring and how it’s all going to work? Don’t worry, I’ve... Read More
Thank you for all this great information, love your work, and will sign up for you newsletter!!
It was so nice meeting you yesterday. Thank you for all the advice on cells.
I am enjoying your blog. I will be buying things through your site. And will visit all your sites.